26 Simple Updo Hairstyle Ideas: Easy Elegance for Every Occasion
The simple updo is one of the most practical and beautiful categories in all of hairstyling — the philosophy that a put-together, elegant updo should not require hours of preparation, a professional stylist, or an advanced skill set. Simple updos work precisely because they rely on a handful of fundamental techniques (twisting, braiding, tucking, pinning) and apply them with elegance and intention rather than complexity. The result is hair that’s out of the face, visually refined, and genuinely beautiful — achieved in minutes rather than hours. Whether the occasion calls for a casual everyday look, a professional setting, or a formal event, simple updos have a version that rises to meet every context.
These 26 simple updo hairstyle ideas cover the full range of updo techniques and occasions, from the most relaxed everyday styles to the most romantic and polished occasion-ready looks.
26 Simple Updo Hairstyle Ideas
1. Twisted Chignon
The twisted chignon is one of the most classically elegant simple updos — it takes the traditional chignon’s refined, low-bun elegance and achieves it through a simple twist rather than a complex rolling or pinning technique. The hair is gathered at the nape, twisted into a rope, coiled into a flat bun shape, and secured with a few strategically placed bobby pins. The twist creates a subtle surface texture that elevates the chignon from plain to genuinely beautiful, while the simple construction keeps the whole process achievable in under five minutes. This is the updo that looks like it took much longer than it did.
Best for: Professional and semi-formal occasions. Medium to long hair. Most face shapes — the low placement at the nape is universally flattering.
How to style: Gather hair at the nape, twist the full length into a rope, coil it around the base, and secure with bobby pins inserted through the coil into the base. Smooth any flyaways with a small amount of pomade on the fingertips.
2. Messy Bun

The messy bun is the quintessential simple updo — so simple it barely feels like a style, yet so consistently attractive that it remains one of the most requested updo references in salons worldwide. The appeal is in its deliberate imperfection: a few escaped strands around the face, a slightly uneven bun shape, some visible texture at the surface. These qualities that would make a formal updo fail are exactly what make a messy bun succeed — they communicate ease, confidence, and casual beauty. The messy bun is proof that perfect imperfection is the hardest thing to achieve and the most compelling when done right.
Best for: Every occasion from casual to semi-formal. All hair types and lengths from shoulder-length upward. Those who want a reliable daily updo with minimal styling time.
How to style: Gather loosely with fingers (not a brush), secure with one elastic at a comfortable height, loop the hair through the elastic only partially on the last pass to create a looped bun, and pull the loop gently to the desired size. Leave a few pieces free around the face.
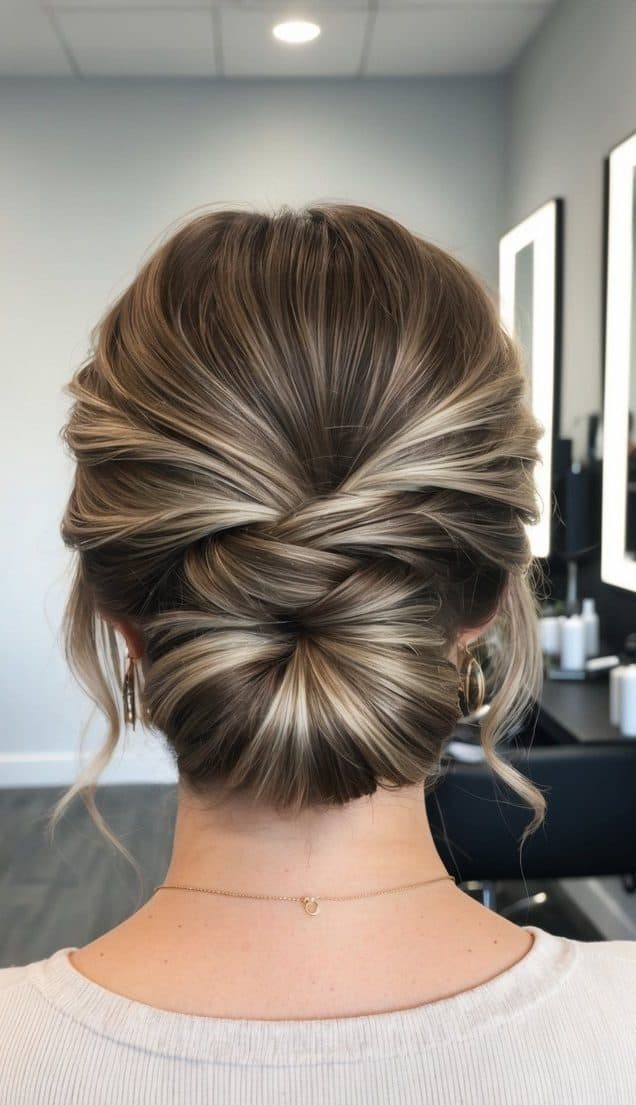
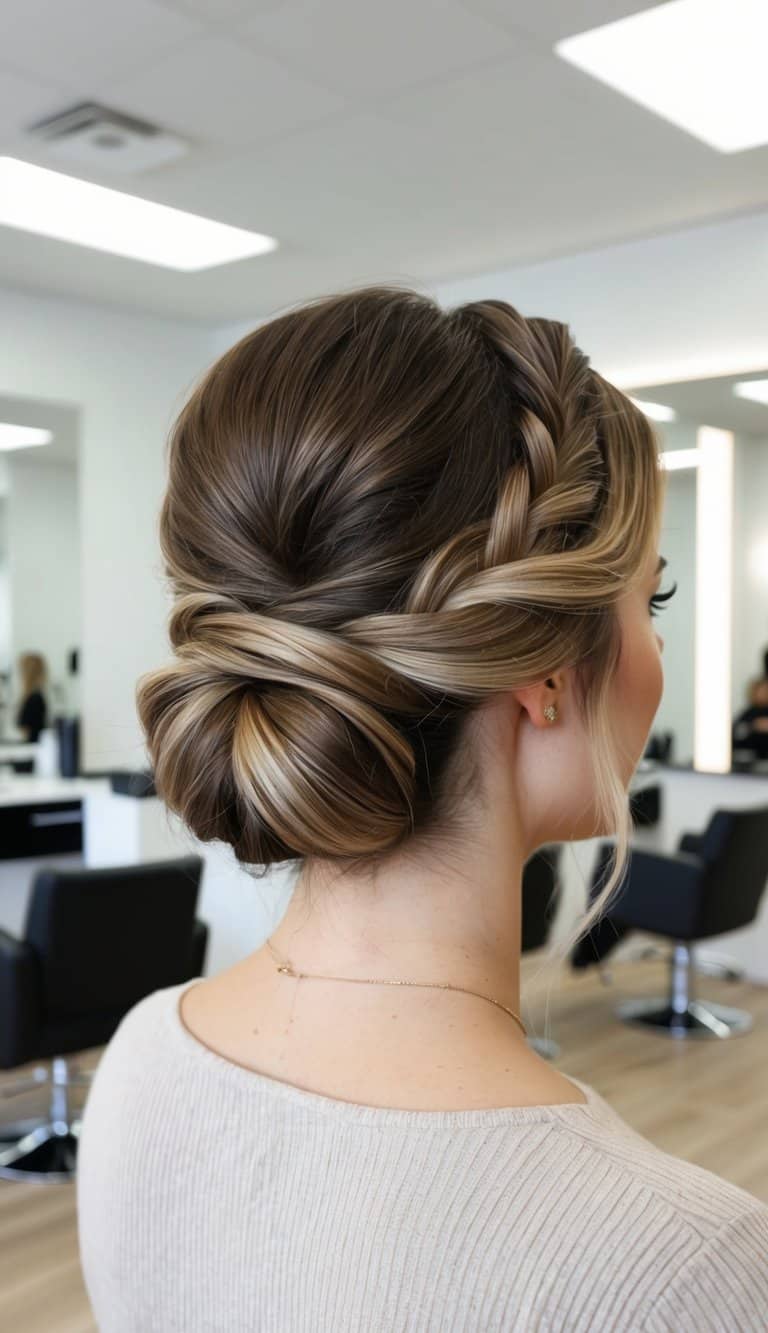
3. Elegant Twist
The elegant twist is a refined, sophisticated updo achieved through a straightforward but visually impressive twist technique — the hair is divided into two sections, each twisted separately, then twisted together and secured at the nape or mid-back to create a single elegant twisted updo. The combined twist creates a rope-like pattern that has genuine visual interest and a crafted quality without requiring any advanced skill. The elegance comes from the neatness and intentionality of the twist — smoothing the sections before twisting creates a more polished, formal result, while leaving natural texture in creates a softer, more relaxed version.
Best for: Semi-formal to formal occasions. Medium to long hair. Those who want an updo with visible technique and elegance but minimal construction time.
How to style: Divide into two sections from the part. Twist each section individually, then cross them over each other while continuing to twist, securing where they meet at the nape with bobby pins. For a more formal version, smooth each section with a fine-tooth comb before twisting.
4. Soft Updo
The soft updo prioritizes a gentle, romantic quality above all else — no hard lines, no tight gathering, no precise structure. Instead, the hair is loosely gathered and arranged in a soft, flowing updo shape that frames the face with loose pieces and has a slightly undone, dreamy quality at the back. The softness is achieved through minimal tension during gathering, intentional placement of escaping pieces, and gentle manipulation of the bun or updo shape with fingertips rather than combs. Soft updos are among the most flattering for formal occasions precisely because they read as effortlessly romantic without the stiffness of a tightly constructed formal style.
Best for: Formal and romantic occasions — weddings, galas, garden parties. Medium to long hair with natural texture or light waves. Those who prefer a soft, feminine updo over a sleek, structured one.
How to style: Allow the hair to air dry with some natural texture or light wave before attempting the updo — the texture creates the soft, organic quality. Gather loosely and pin gently, leaving the surface of the updo slightly irregular and soft rather than smoothing it.
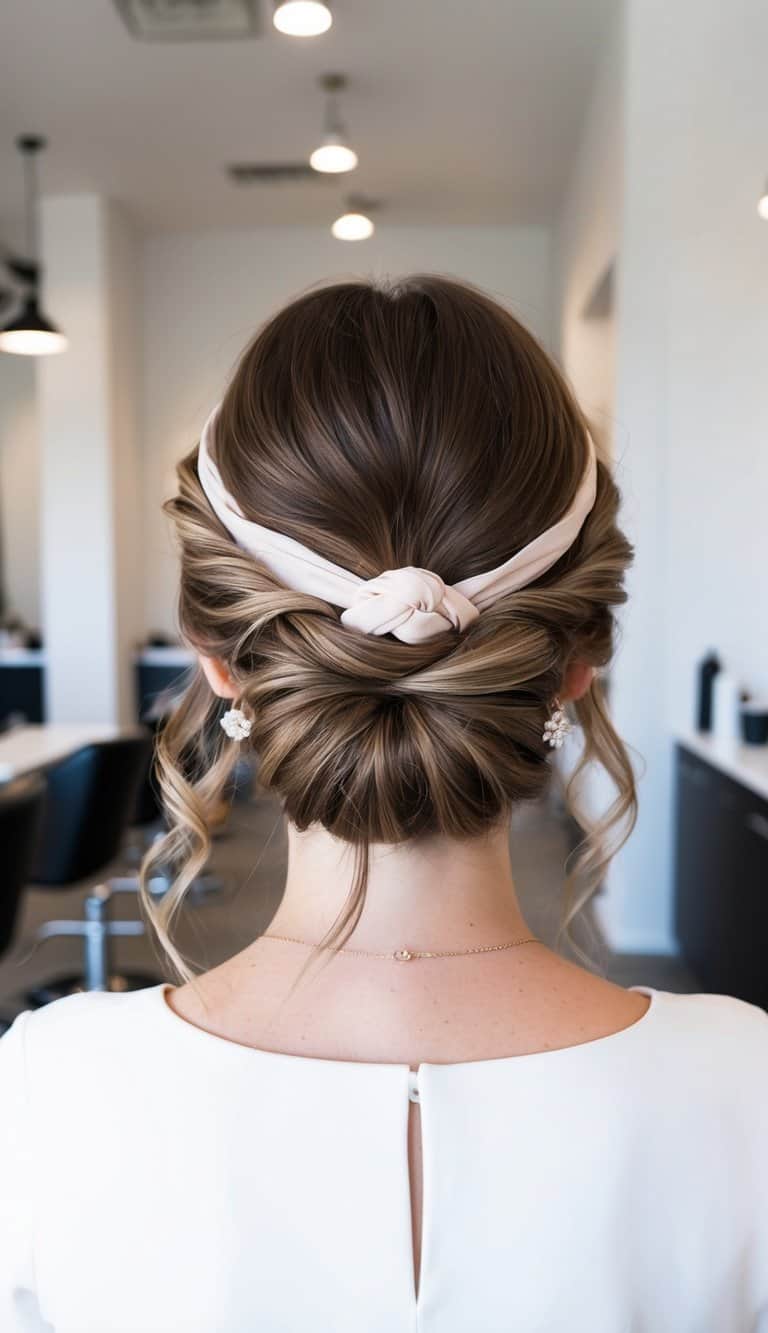
5. Knotted Headband Updo

The knotted headband updo uses a fabric or elastic headband as the primary structural tool — the headband is placed across the head, and sections of hair are fed over it and tucked underneath, working from the front back, until all the hair has been incorporated into the headband-supported updo. The result is a surprisingly polished and secure updo that looks like it was carefully pinned but was actually constructed through the simple tucking motion. The knotted quality refers to the way the tucked sections fold over and under, creating visible knot-like texture along the headband’s path.
Best for: All hair lengths that reach past the chin. Most face shapes. Casual to semi-casual occasions. Those who want a simple updo that stays in place without bobby pins.
How to style: Place a stretchy headband like a halo around the head (not on the hairline but set back about 2 inches). Working from the front, take small sections of hair, wrap them over the headband from front to back, and tuck them under. Continue around the head until all hair is incorporated.
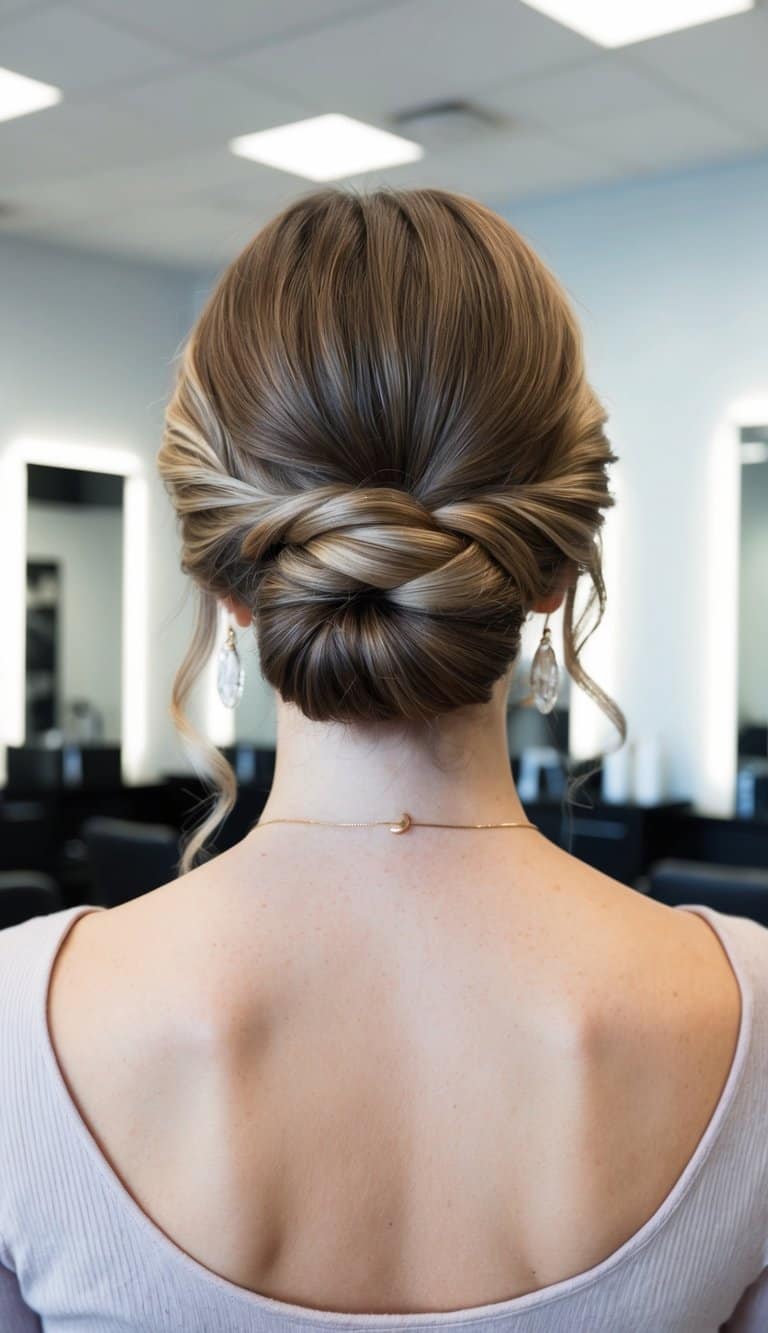
6. Gibson Tuck
The Gibson tuck is one of the most elegant and most simple formal updos in existence — it creates a sophisticated, nape-length updo using only a ponytail elastic and a few bobby pins. The hair is gathered into a low ponytail, the ponytail is folded upward under the elastic, and the fold is secured to create a neat, flat chignon-like updo without any wrapping, rolling, or complex construction. The Gibson tuck’s profile — flat, smooth, and elegant at the nape — is impeccably refined and professional, making it one of the most valuable simple updos in a practical style repertoire.
Best for: Medium to long hair. Professional and formal occasions. Most face shapes — the flat, low placement is particularly elegant for oval and long faces. Those who want a sleek, polished updo achievable in under three minutes.
How to style: Create a low ponytail, loosen the elastic slightly to create a small gap between elastic and scalp, then tuck the ponytail length upward through the gap. Secure the tucked ends with two or three bobby pins hidden within the fold.
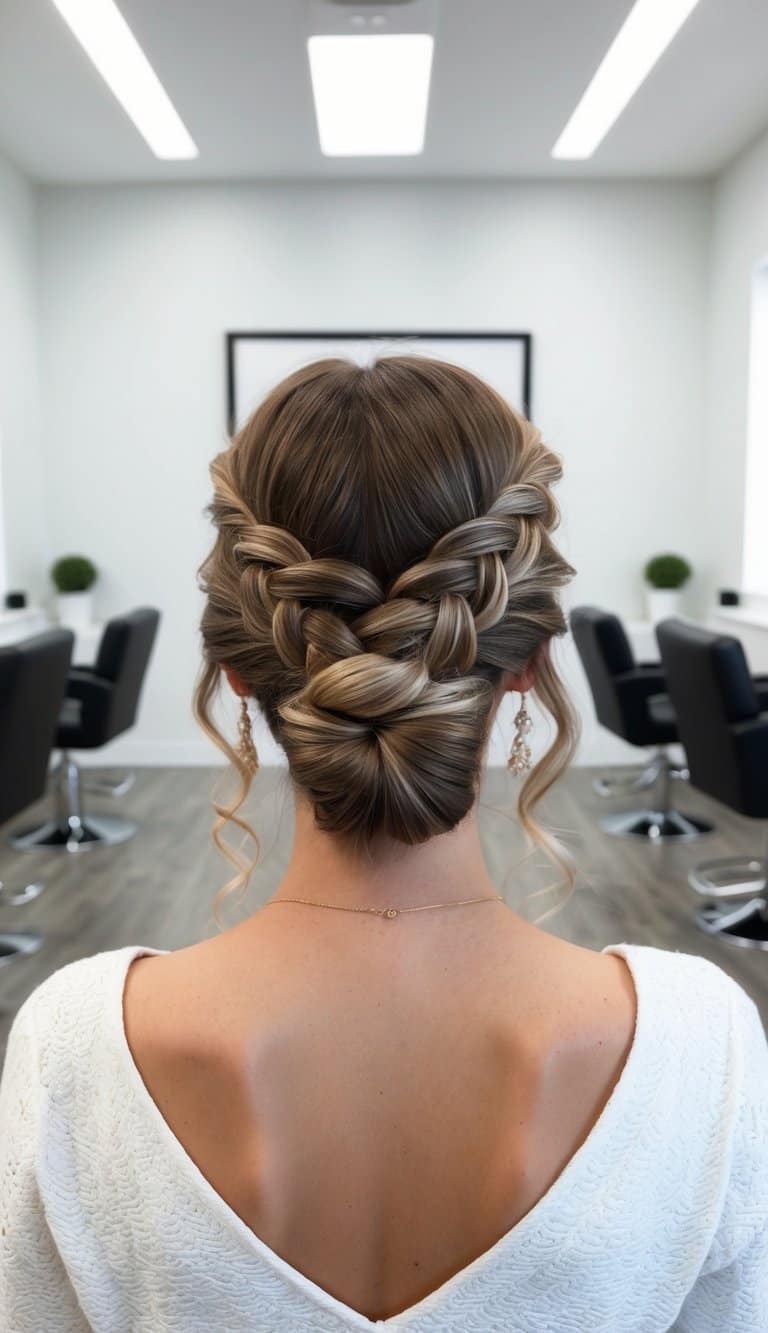
7. Low Braided Bun
The low braided bun combines the textural interest of braiding with the elegant simplicity of a low bun — the hair is braided (typically in a three-strand braid) from gathered at the nape, and then the braid is coiled into a flat bun shape and secured. The braid’s texture is visible at the surface of the bun, creating a visually interesting updo that reads as more crafted and considered than a simple wrapped bun while taking only slightly more time. The low placement adds elegance and formality, making the low braided bun suitable for occasions where a more structured updo is appropriate.
Best for: Medium to long hair. Semi-formal and formal occasions. Most face shapes. Those who want a simple updo with visible technique and more visual interest than a plain bun.
How to style: Gather into a low ponytail, braid loosely to the ends, coil the braid around the base in a flat spiral, and secure with bobby pins. Gently pull the braid loops to loosen for a more relaxed, organic quality.
8. Twisted Halo Gibson Tuck

The twisted halo Gibson tuck is an elevated version of the classic Gibson tuck — before folding the ponytail upward, the length is twisted into a rope, so the tucked portion is a twisted rather than plain folded section. The twist creates visible texture at the base of the updo where the tucked section is secured, and the twisting also creates a tighter, more cohesive fold that’s even more secure than the plain tuck. The “halo” quality refers to the smooth gathering from the front that creates a halo-like effect over the crown before the hair descends to the tuck at the nape.
Best for: Medium to long hair. Formal and professional occasions. Those who want the simplicity of the Gibson tuck with more visible texture and structural interest.
How to style: Create a low ponytail, twist the length into a rope, loosen the elastic slightly, fold the twisted rope upward through the gap, and secure the twisted end with bobby pins hidden within the fold.
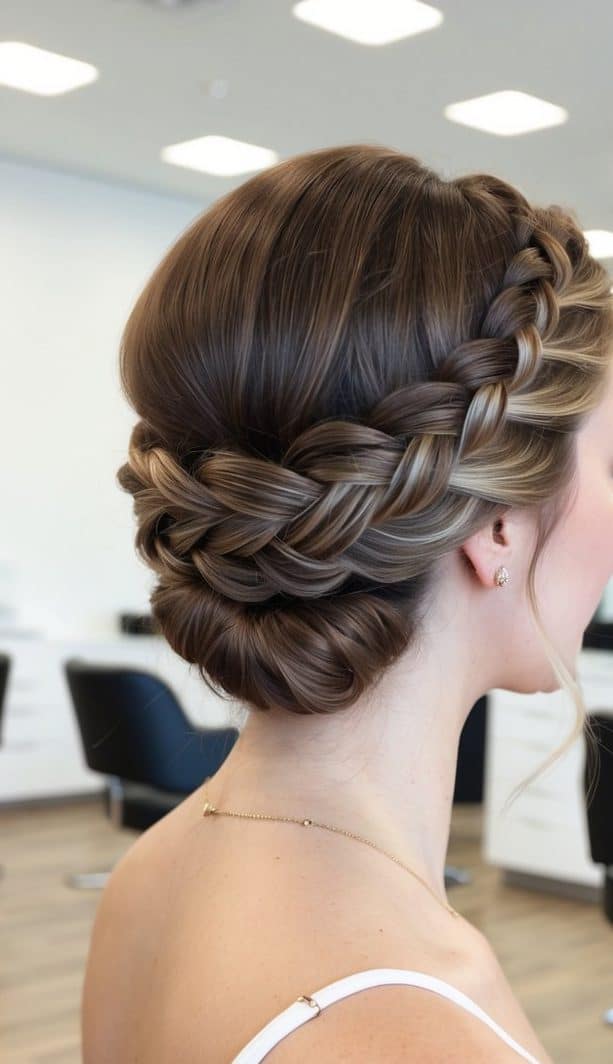
9. Halo Braid

The halo braid — also called the crown braid — creates a braid that encircles the entire head like a crown or halo, using a Dutch or French braid technique that incorporates hair from the hairline all the way around the head. The result is one of the most romantically beautiful and distinctly regal simple updos available — the braid creates a full, textured crown that looks like it took expert hands and significant time but can be achieved by most people with a little practice. The halo braid works for any occasion from bohemian outdoor events to formal weddings.
Best for: Medium to long hair with enough length to reach around the head. Most face shapes — the circular braid creates an oval effect that’s universally flattering. Romantic, bohemian, and bridal occasions.
How to style: Start behind one ear with a Dutch braid, incorporating small sections from the hairline as you braid around the head. When you complete the circle, secure the braid end under the starting point with bobby pins. Gently pull the braid loops to widen and add fullness.
10. Crisscross Bun
The crisscross bun adds an interesting visual detail to a standard bun by creating a visible X-pattern on the surface — sections of hair cross over each other before being incorporated into the bun, leaving the crisscross pattern visible as a decorative element on the bun’s surface. This simple modification transforms what would be a plain bun into something that looks deliberately crafted and fashion-forward, without adding significant time or complexity to the construction. The crisscross can be created with two sections crossing once, or multiple sections crossing in an elaborate pattern for a more complex appearance.
Best for: Medium to long hair. Casual to semi-formal occasions. Those who want their simple updo to have a visible, decorative detail that sets it apart from a standard bun.
How to style: Divide the gathered hair into two sections. Cross the right section over the left, then bring the left section over the right (creating the X). Continue wrapping around the base and secure. The crossed sections should be visible at the front of the bun.
11. Double Dutch Bun
The double Dutch bun creates two symmetrical buns — one on each side of the head — each constructed using a Dutch braid technique that incorporates hair from the scalp, creating structured, textured buns with braided bases visible below each bun. The double placement creates a balanced, graphic silhouette that reads as playful and fashion-forward, while the Dutch braid technique adds the textural interest and structural security that plain buns lack. This is the simple updo for those who want a youthful, contemporary look with personality and visual impact.
Best for: Medium to long hair. Those with a playful, fashion-forward personal style. Casual and creative occasions — festivals, concerts, creative workplaces. Most face shapes, with the side-by-side bun placement adding width that’s most flattering for longer and more angular faces.
How to style: Part down the center. On each side, begin a Dutch braid from the hairline above the ear, incorporating hair downward, then secure at the nape. Wrap the braid ends into a bun on each side, securing with pins and elastics.
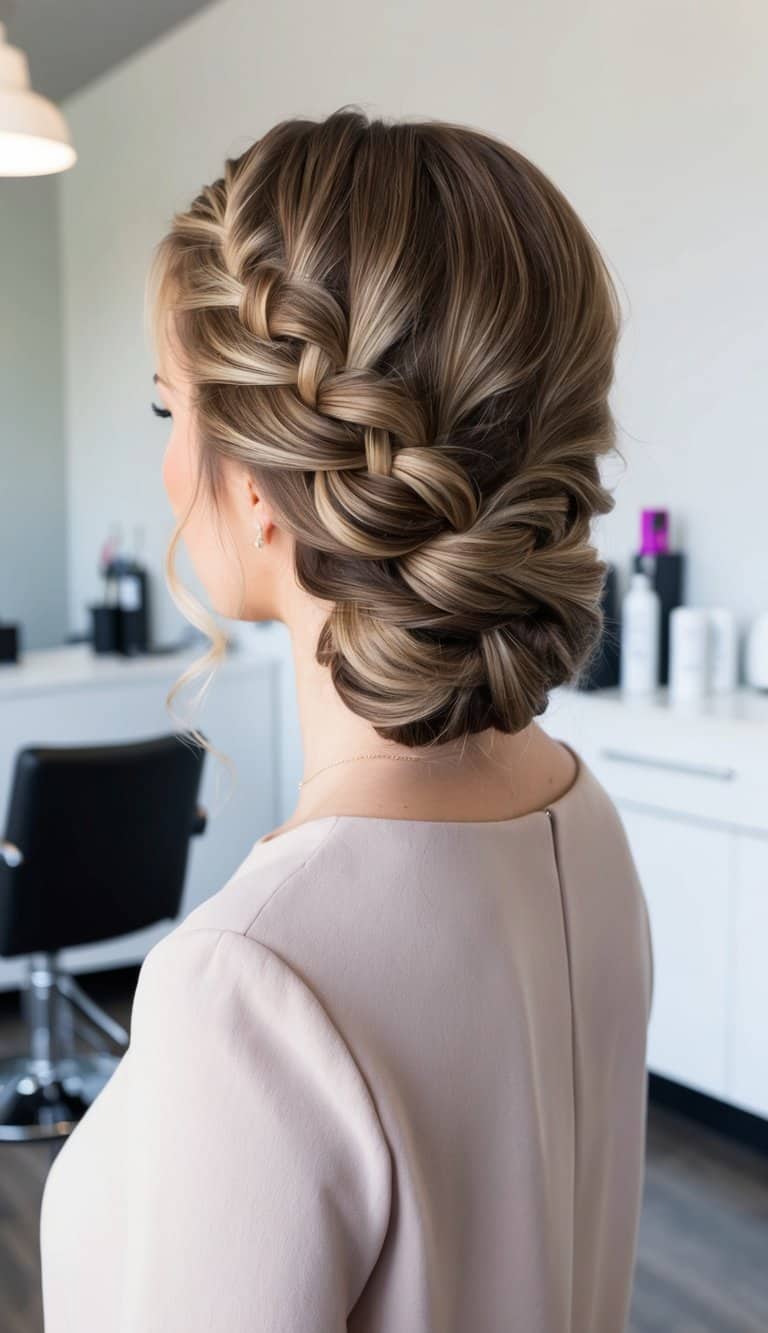
12. Intricate Braided Updo
The intricate braided updo occupies the upper end of the “simple” updo spectrum — it incorporates multiple braiding elements (a Dutch braid from the front, a fishtail braid at the gathered section, a braided bun at the finish) to create an updo of apparent complexity that’s achieved by stacking simple braiding techniques rather than mastering a single advanced one. The result looks significantly more elaborate than any of its individual steps would suggest, creating the impression of expert craftsmanship from accessible techniques. This is the updo for special occasions when a genuinely impressive updo is desired without a stylist appointment.
Best for: Long hair. Formal, bridal, and special occasion events. Those who want an updo that earns genuine compliments on its apparent complexity.
How to style: Begin with a Dutch braid or lace braid from one side of the hairline, sweeping it toward the opposite side. Gather all remaining hair into a low ponytail. Fishtail or three-strand braid the ponytail length. Coil the braid into a decorative bun and secure with pins, allowing the initial braid to drape over the finished bun.
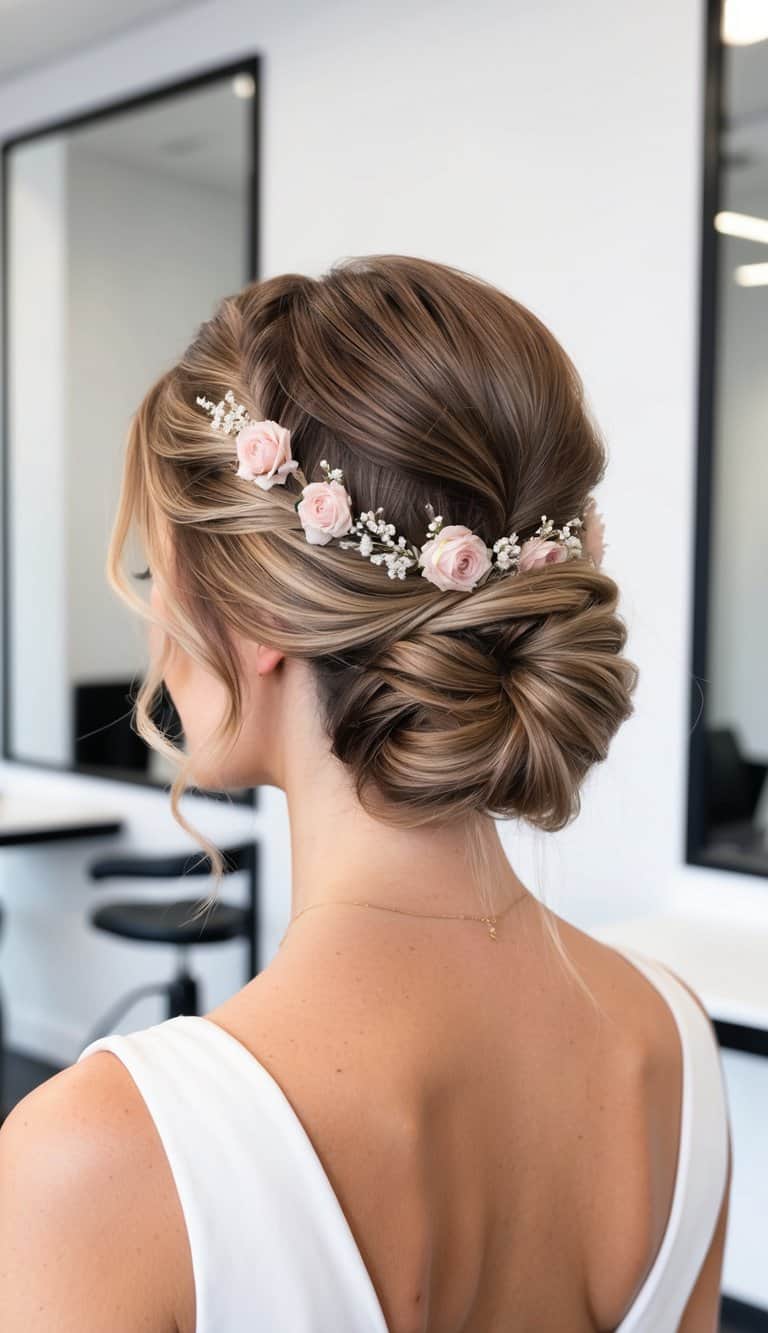
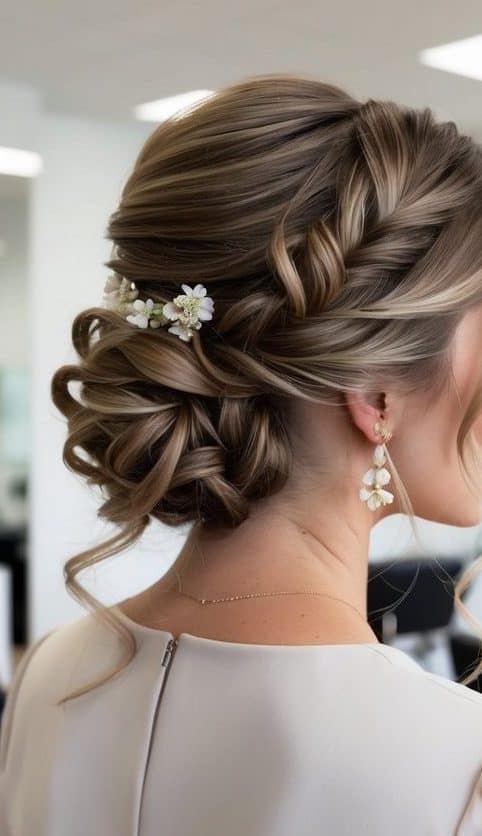
13. Floral Bun Updo

The floral bun updo uses fresh, dried, or silk flowers tucked into a simple bun to create an instantly romantic, occasion-ready updo. The flowers do the heavy lifting aesthetically — a plain, simple bun becomes something genuinely beautiful once floral elements are added at the right points. The flower placement should feel organic rather than arranged: tucked into the bun’s folds, woven through the surface, or gathered at one side for a slightly asymmetrical, wild-garden quality. Fresh flowers are the most beautiful option but require day-of placement; dried flowers or high-quality silk alternatives offer more durability for longer events.
Best for: Outdoor weddings, garden parties, spring and summer events, bohemian celebrations. Medium to long hair. All face shapes — the flowers can be strategically placed to frame or balance facial proportions.
How to style: Construct the base bun first, then add flowers by inserting their stems into the bun alongside bobby pins. Smaller flowers scattered throughout create a more natural quality; larger statement blooms placed at specific points create a more curated look.
14. Half-Up Twist
The half-up twist is one of the most accessible and universally flattering simple updos — it takes only the top section of the hair (from the temples and crown), twists it back, and secures it at the center back, leaving the lower half of the hair loose. The twist at the top creates a lifted, tidy quality at the crown and face while the loose lower half provides movement, volume, and the relaxed quality that makes this look feel contemporary and effortless. The half-up twist is the ideal compromise between fully down and fully up — it keeps the face clear while letting the hair’s length and texture remain visible.
Best for: All hair lengths from shoulder-length upward. Most face shapes. Casual to semi-formal occasions. Those who want a quick, reliable style that elevates their look without committing to a full updo.
How to style: Section from temple to temple across the crown. Twist the top section loosely and secure at the center back with a single bobby pin or a small elastic. Pull the twist slightly to widen and add volume above the pin.
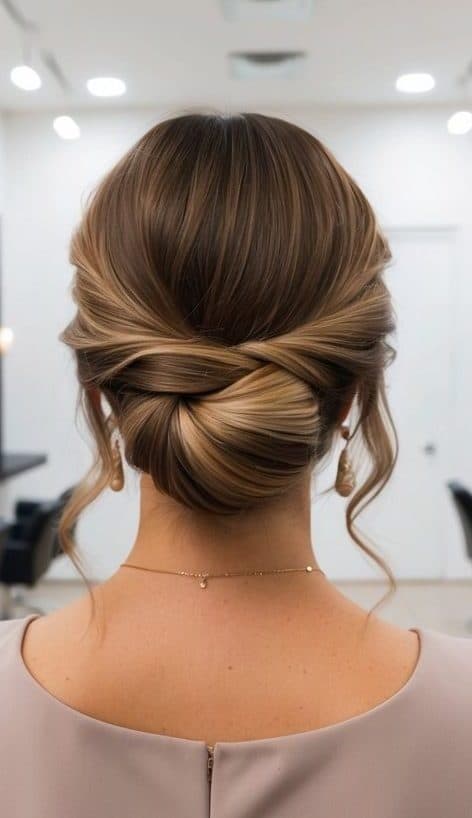
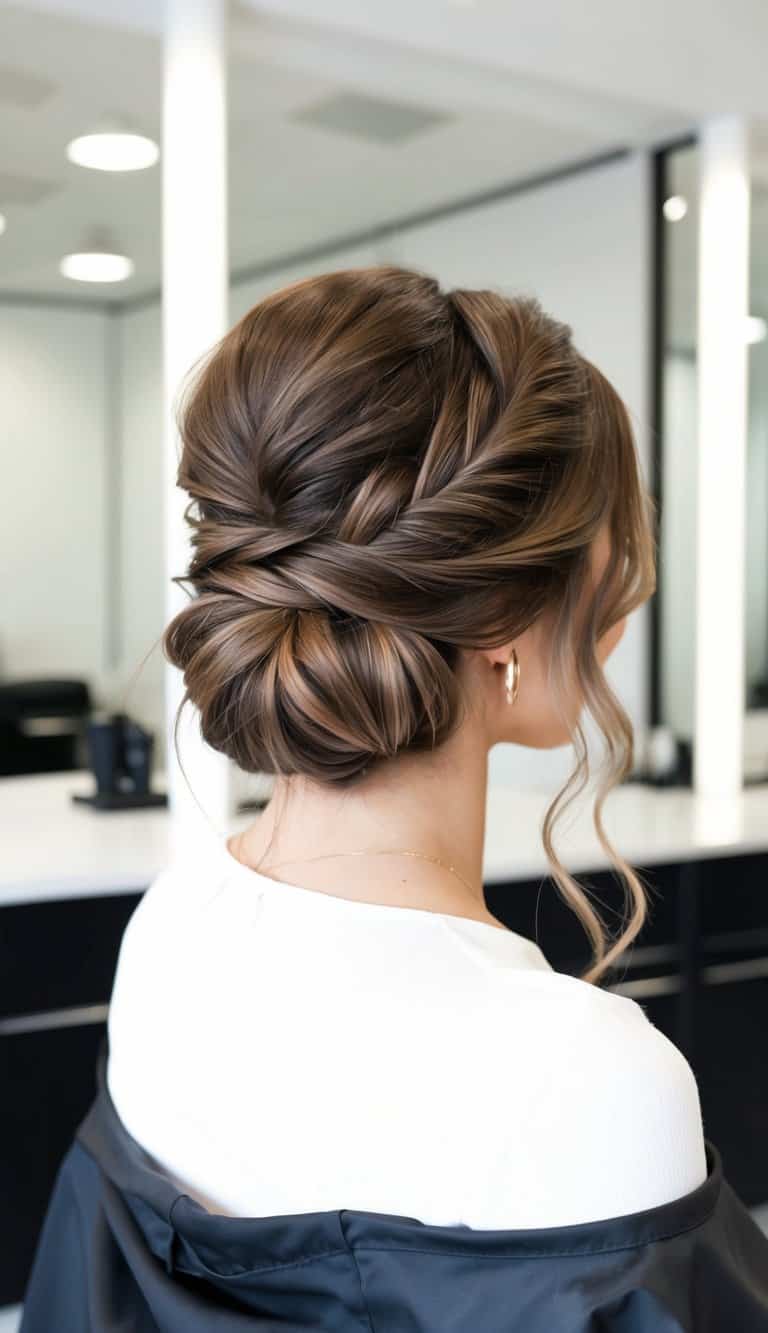
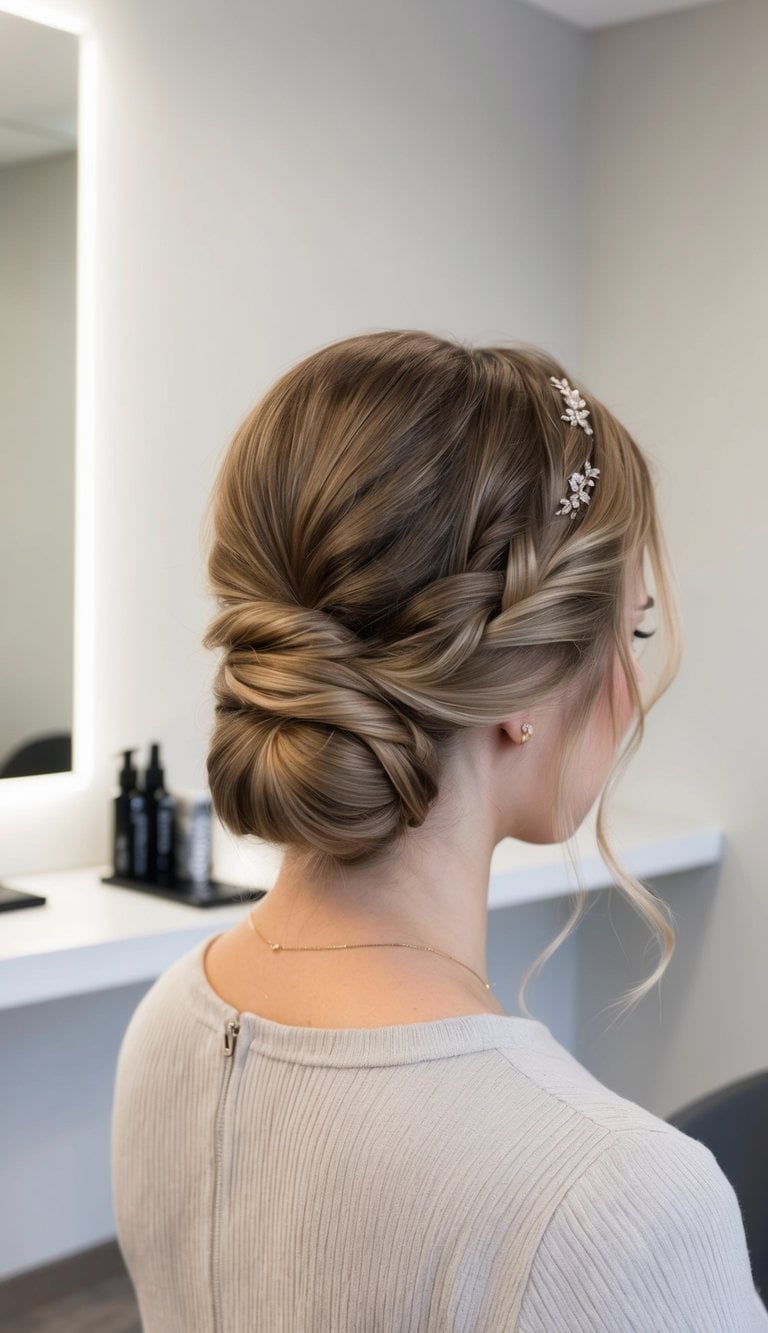
15. Twisted Low Bun
The twisted low bun is one of the most reliable and polished simple updos for professional and semi-formal contexts — the combination of twisting and low placement creates an updo that reads as both elegant and effortless, with visible technique at the surface of the bun (the twist) and refined placement at the nape that exposes the neck beautifully. The twist prevents the bun from appearing flat or plain, adding texture and dimension to what might otherwise be a generic low bun. This is the everyday office updo that consistently looks intentional and put-together.
Best for: Medium to long hair. Professional and semi-formal occasions. Oval, long, and heart face shapes where the low placement is most elegantly proportional.
How to style: Gather at the nape, twist the gathered hair into a rope, wrap the rope around the base, and secure with bobby pins. The twist remains visible on the bun surface. Smooth any surface flyaways with a light-hold spray.
16. Lace Braid Updo
The lace braid updo incorporates a lace braid — a variation of the French braid that picks up hair from only one side rather than both — along the hairline or across the crown before gathering the remaining hair into a bun or low updo. The lace braid creates a delicate, intricate-looking detail at the front of the updo that frames the face beautifully and adds a feminine, romantic quality to the overall look. The lace braid is generally simpler to execute than a full French or Dutch braid, making it accessible even for those without extensive braiding experience.
Best for: Medium to long hair. Romantic and semi-formal occasions. Those who want their updo to have a delicate, detail-forward quality at the front. Most face shapes — the lace braid at the hairline frames the face in a way that’s flattering for most profiles.
How to style: Begin a lace braid at the temple, picking up sections from the hairline as you braid along the forehead or across the crown. When you reach the desired end point, incorporate the braid into a low bun or secured gathering at the back.
17. Looped Twist Bun
The looped twist bun creates a bun where the hair is not tightly wrapped or coiled but instead formed into visible loops — the hair is twisted and then looped back on itself multiple times, with each loop secured as it’s created, building a bun with a distinctly open, airy quality rather than a compact, dense one. The loops create visible circles of hair on the bun’s surface, adding texture and dimension that make the finished updo look both elaborate and light. This technique is particularly beautiful in looser, more organic constructions where the loops aren’t uniform but vary in size and direction.
Best for: Medium to long hair. Semi-formal and formal occasions. Those who want a bun with visible texture and dimension rather than a compact, smooth surface.
How to style: Gather into a low ponytail. Take sections of the ponytail, loop them back toward the base and secure each loop with a bobby pin as you go, building the bun from multiple secured loops rather than a single wrapped length. Leave the loops slightly loose for the airy, dimensional quality.
18. Fluffy Chignon
The fluffy chignon reimagines the traditional elegant chignon with maximum volume and texture — rather than the smooth, flat profile of a classic chignon, the fluffy version has an inflated, cloud-like quality created through backcombing before gathering, strategic pin placement that maintains volume, and gentle manipulation of the surface to pull sections outward. The fluffy quality makes the chignon appear larger and more substantial than the plain hair volume would suggest, creating an updo with presence and dimensionality. This is the chignon for those who love the elegant, nape-focused style but want more drama and volume.
Best for: Fine to medium hair that benefits from volume techniques. Semi-formal to formal occasions. Those who want a glamorous, full-bodied updo with the chignon’s elegant placement.
How to style: Backcomb the hair thoroughly before gathering, apply a volumizing spray at the roots, gather at the nape while maintaining as much of the backcombed volume as possible, and secure into a flat bun. Gently pull the surface sections outward with fingertips to create the fluffy, full quality.
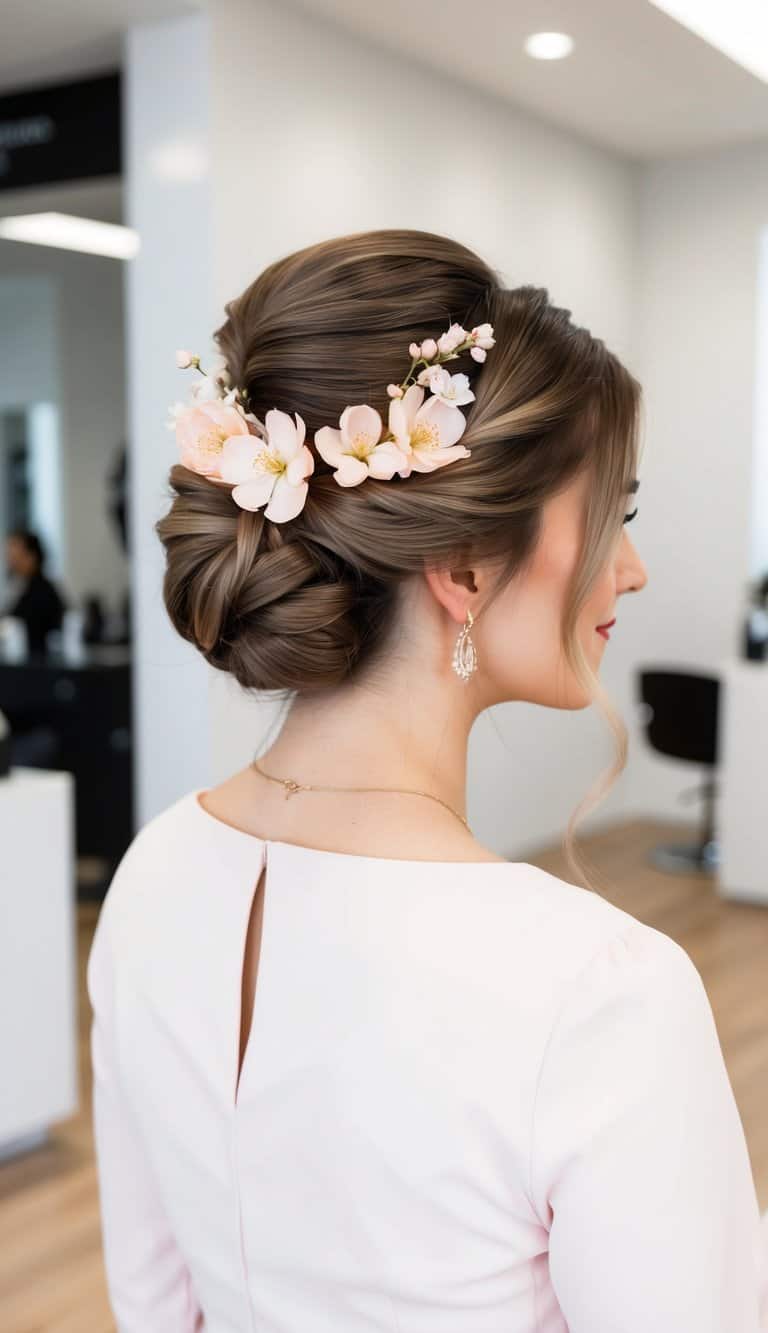
19. Peach Blossom Bun
The peach blossom bun is a delicately beautiful updo that takes its name and aesthetic from the soft, rounded, multi-petaled quality of peach blossoms — the bun is constructed to suggest a flower in bloom, with multiple soft loops or twisted sections arranged around a central point to create a petal-like pattern. The effect is created by dividing the gathered hair into sections and coiling each section into a petal shape, pinning at the tips and arranging the petals around a center. The result is an updo that looks like a flower has grown at the nape — organic, romantic, and quietly extraordinary.
Best for: Medium to long hair. Weddings, garden parties, spring events, and any occasion where a romantically beautiful updo is desired. Most face shapes. Those who want an updo that draws genuine admiration without requiring professional construction.
How to style: Gather at the nape. Divide into 5–6 sections. Twist each section and coil into a flat, petal shape, securing the tip of each petal at the center with a bobby pin. Arrange the petals to overlap slightly around the center, creating the blossom effect.
20. Soft Curls and Florals
Soft curls and florals combines a partially upswept style — with curled sections pinned loosely at the back — with floral accessories tucked throughout the pinned sections and cascading loosely from the updo. Some of the curled hair remains loose at the front and sides, creating a romantic half-up quality where the soft curls frame the face while the floral-adorned updo creates a beautiful back view. This is one of the most photographically beautiful simple updos — the combination of soft curls and fresh florals creates something genuinely bridal and special that photographs extraordinarily well.
Best for: Long to medium hair with enough length to curl and pin. Bridal occasions and formal events. Those who want a romantically beautiful updo that showcases both the hair’s movement and a floral accessory element.
How to style: Curl all hair first with a large-barrel curling iron. Pin the back sections loosely into a gathered updo using bobby pins, allowing some curls to hang free. Tuck fresh or silk flowers into the pinned section before finishing with hairspray.
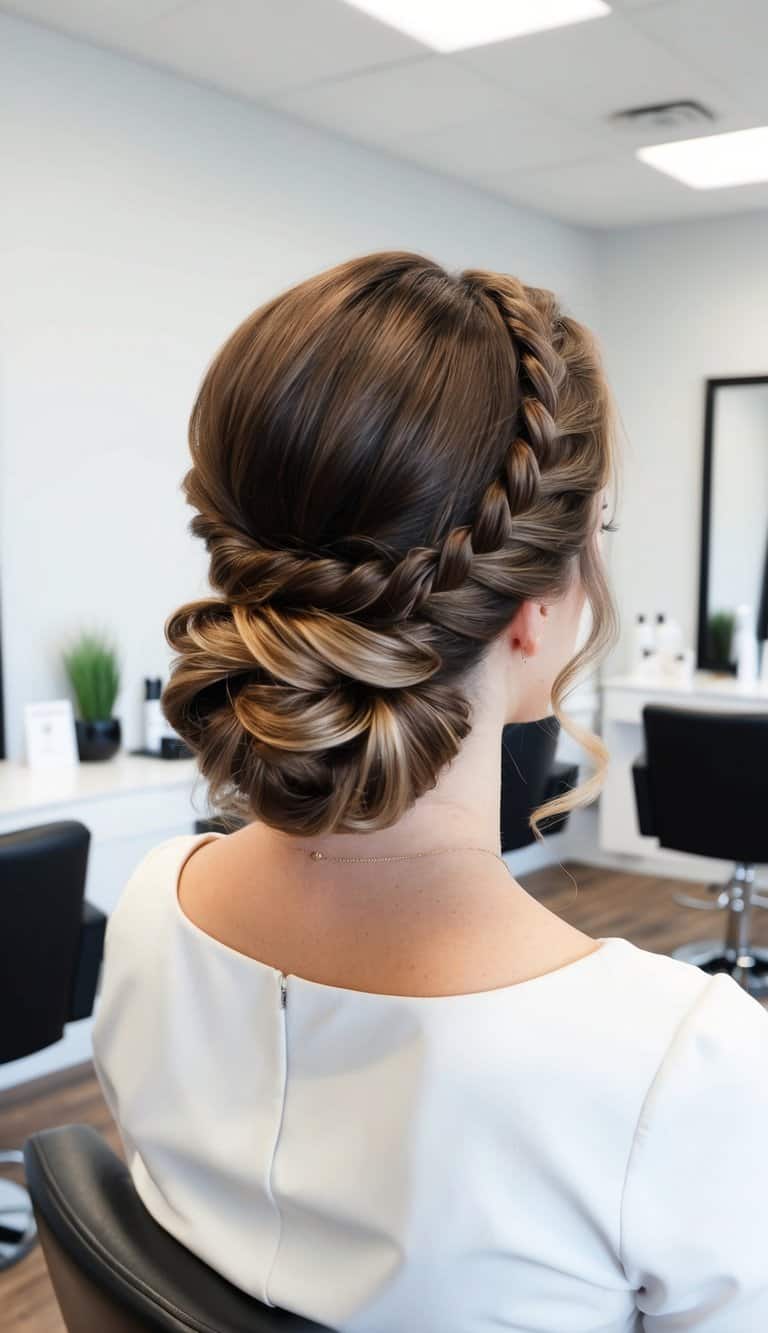
21. Braided Twist
The braided twist creates a specific updo where a braid and a twist are combined — the hair may be braided from the front and then twisted with the remaining sections at the back, or two side braids may be twisted together at the nape to create the finished updo. The combination of braiding and twisting creates more texture and visual complexity than either technique alone, but remains achievable without advanced skill since each individual element (a braid, a twist) is simple on its own. The braided twist is particularly beautiful in second-day or naturally textured hair where the braid and twist have extra grip and body.
Best for: Medium to long hair. Casual to semi-formal occasions. Those who want a simple updo with more visible technique than a plain bun or chignon.
How to style: Create a loose braid down one side from the temple. Gather all remaining hair at the nape. Twist the braid into the gathered hair and secure together, wrapping the combined braid-and-gathered section into a low twisted bun.
22. Rolled Bun
The rolled bun creates an updo with a slightly retro, vintage quality — the hair is rolled upward rather than wrapped, the rolling motion creating a smooth, cylindrical section that’s then tucked and secured. The roll creates a different surface quality from a twisted or wrapped bun: smoother and more uniform at the visible surface, with a slightly rounded, structured profile that references mid-century updo aesthetics. The rolled bun is elegant and refined without being ostentatious, making it an excellent choice for professional and semi-formal contexts where a more sophisticated updo is desired.
Best for: Medium to long hair. Professional and semi-formal occasions. Those who appreciate vintage-adjacent aesthetics and want their updo to have a slightly more structured, polished quality than a contemporary messy or wrapped bun.
How to style: Gather the hair and begin rolling upward from the nape, folding and smoothing as you roll rather than twisting. Tuck the ends under the roll and secure with bobby pins along the length of the roll at multiple points.
23. Vintage Finger Waves
Vintage finger waves bring the sculpted, glamorous waves of 1920s and 1930s style into a contemporary updo — the deep, S-shaped waves created by fingers and a comb are set along the sides and crown, then the remaining length is pinned up at the back in a sleek chignon or rolled bun. The finger wave element transforms the updo from simply elegant to genuinely theatrical and special, with the sculpted waves creating a vintage Hollywood quality that’s unlike any other updo in this collection. Finger waves require some technique but are achievable with practice and the right products.
Best for: Straight to slightly wavy hair where finger waves set most crisply. Short to medium length where the wave pattern is most visible and defined. Those with a strong affinity for vintage aesthetics and formal occasions.
How to style: Apply a strong-hold gel to damp hair. Use a fine-tooth comb and fingers to create the S-wave pattern along the sides and crown, using wave clips to set each wave while it dries. Once dry, remove clips and pin the back sections into the updo.
24. Braided Crown
The braided crown creates a regal, wreath-like braid that sits at the crown of the head — unlike the halo braid that encircles the full head, the braided crown is positioned specifically at the top, creating a crown-like ring of braid. This can be achieved by braiding two side sections and pinning them at the top to meet in the middle, or by creating a single braid and pinning it into a crown shape at the top of the head. The braided crown is particularly beautiful for summer occasions and any context where a feminine, romantic updo with a bohemian-regal quality is desired.
Best for: Medium to long hair. Outdoor and bohemian occasions — weddings in gardens, outdoor festivals, summer parties. Most face shapes — the crown positioning draws attention to the top of the head and creates a lifted, regal effect.
How to style: Create two loose Dutch or French braids starting above each ear and working backward. Bring both braids up and over the crown, pinning them to meet in the middle. Secure with bobby pins and gently pull the braid loops for fullness.
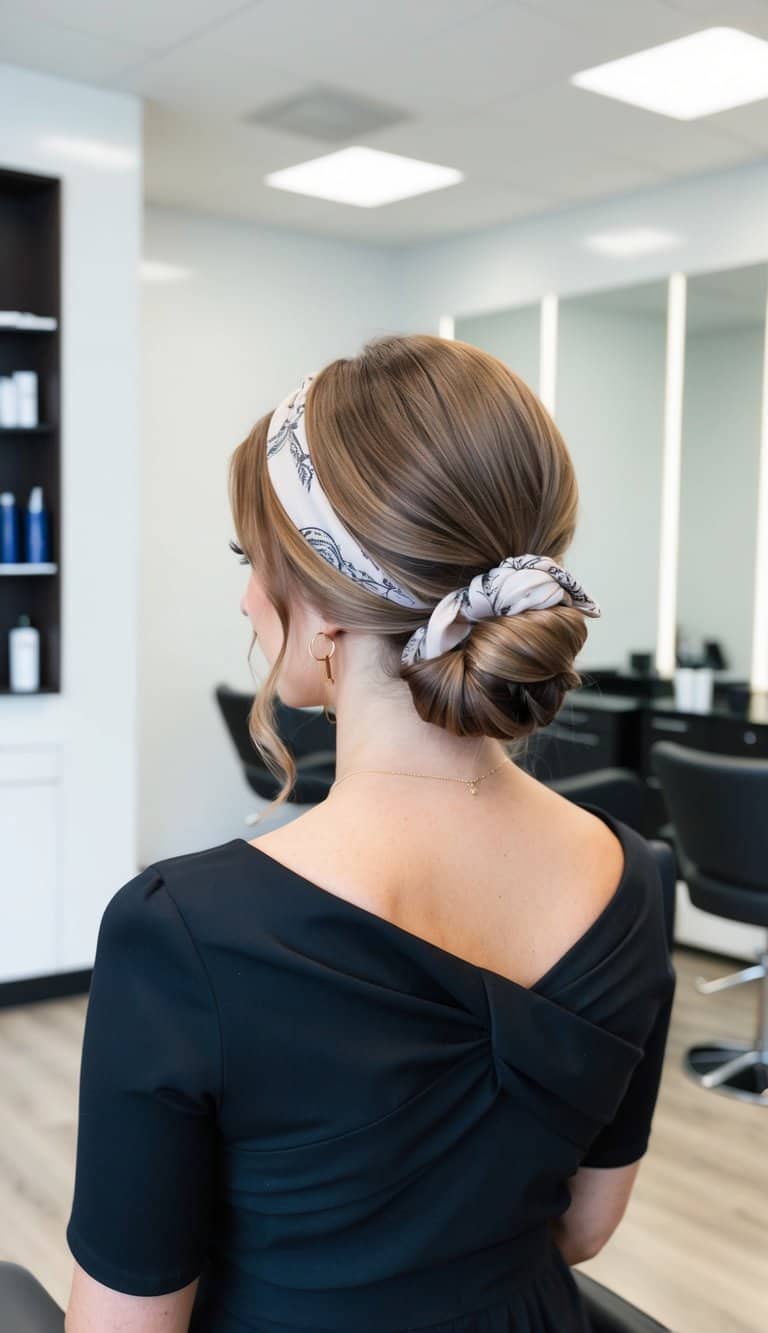
25. Scarf Wrapped Bun
The scarf wrapped bun adds a fashion accessory element to the simple bun — a silk scarf, cotton bandana, or fabric strip is woven through or wrapped around the bun, adding color, pattern, and personality to what is essentially a basic updo. The scarf transforms the bun from a practical hairstyle into a considered, accessorized look that bridges hair and outfit. The wrapping can be minimal (a simple tie at the base) or elaborate (the scarf woven through the entire bun), with more coverage creating a more fashion-forward, maximalist effect and less coverage creating a subtle, elegant accent.
Best for: Medium to long hair. Casual and summer occasions. Those who want their updo to incorporate a fashion accessory and color statement. All face shapes.
How to style: Construct the base bun first. Fold the scarf into a strip. Either tie the strip around the base of the bun like a ribbon or weave the strip through the bun’s sections, threading it in and out before tying the ends in a bow or knot at the top or side.
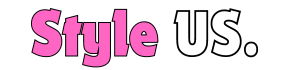
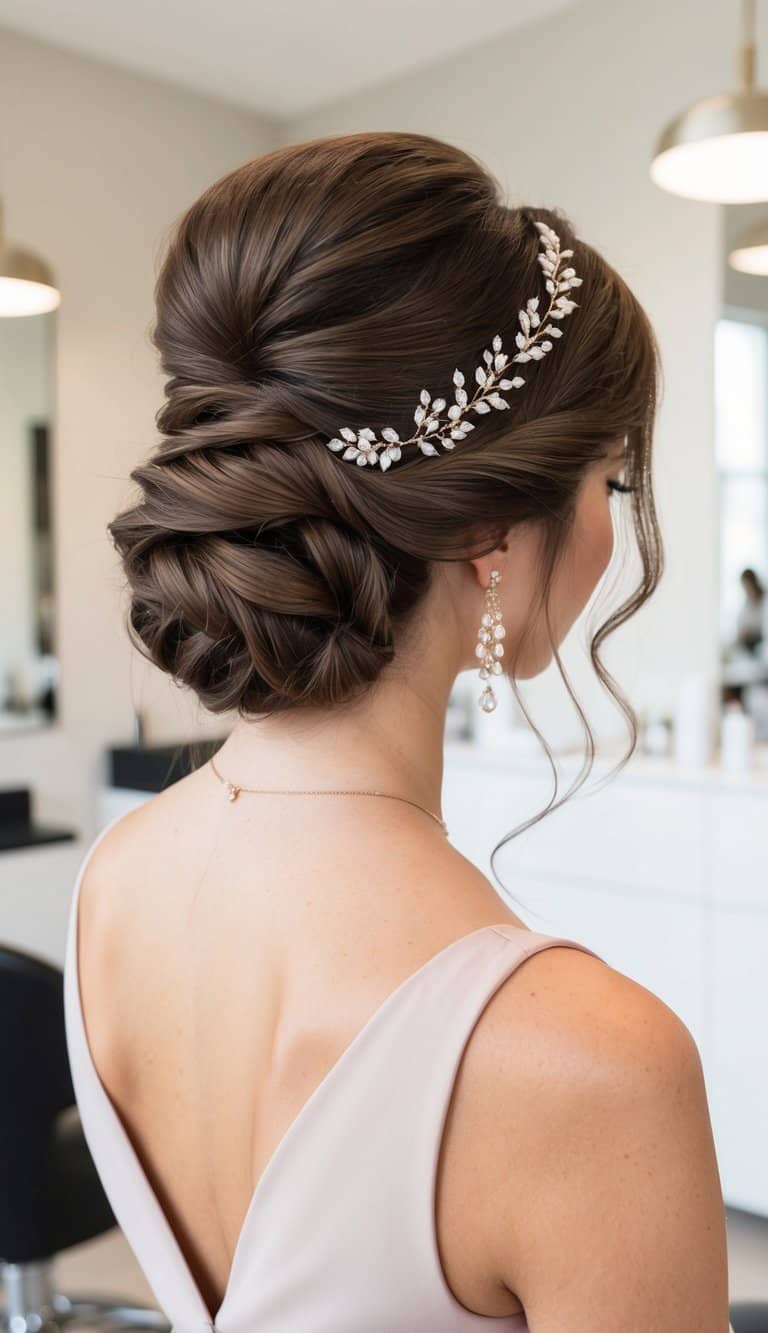
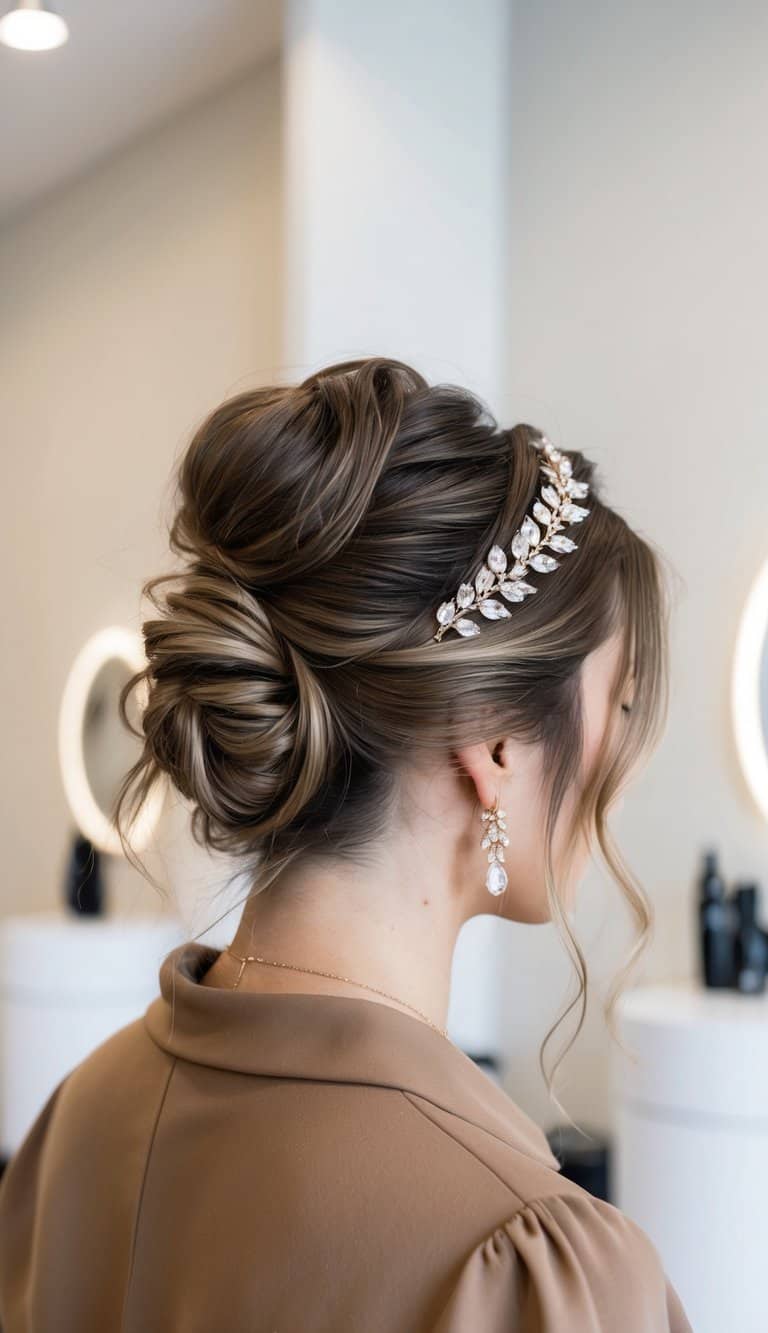
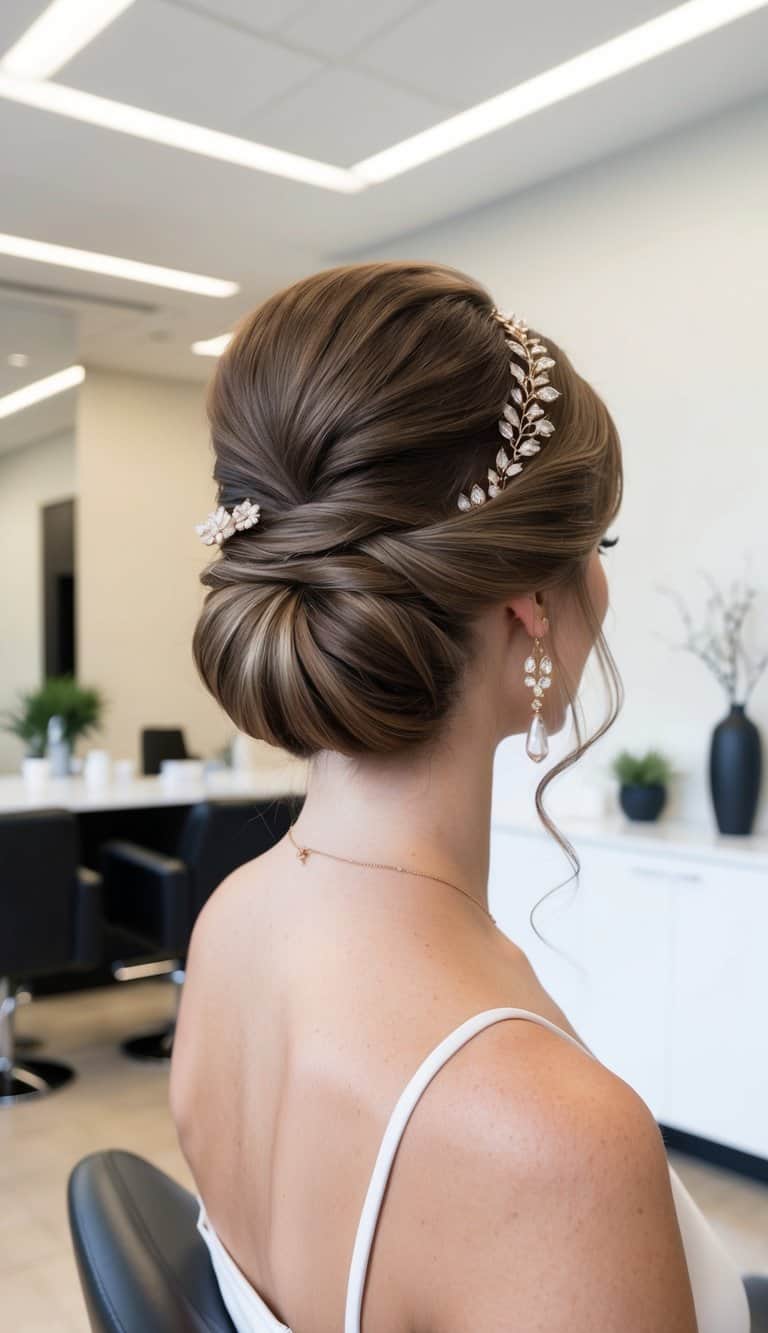
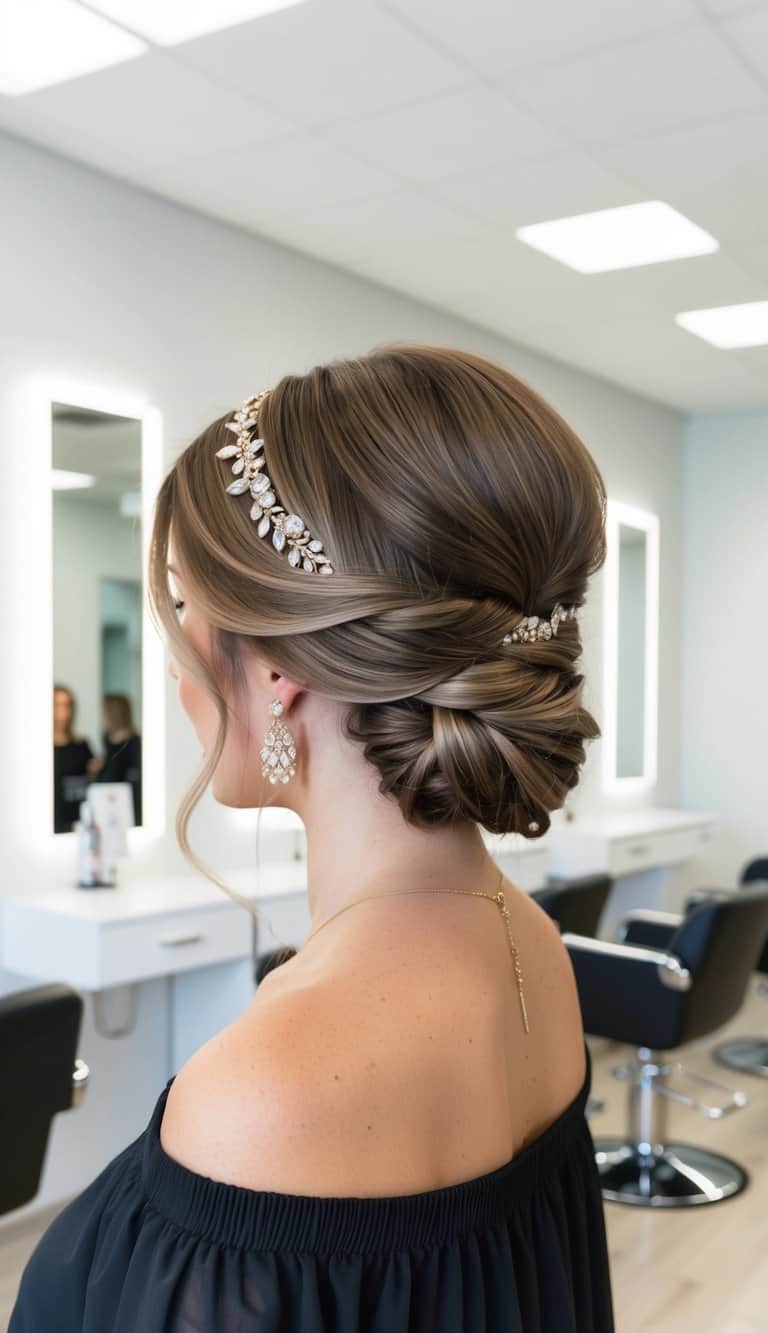
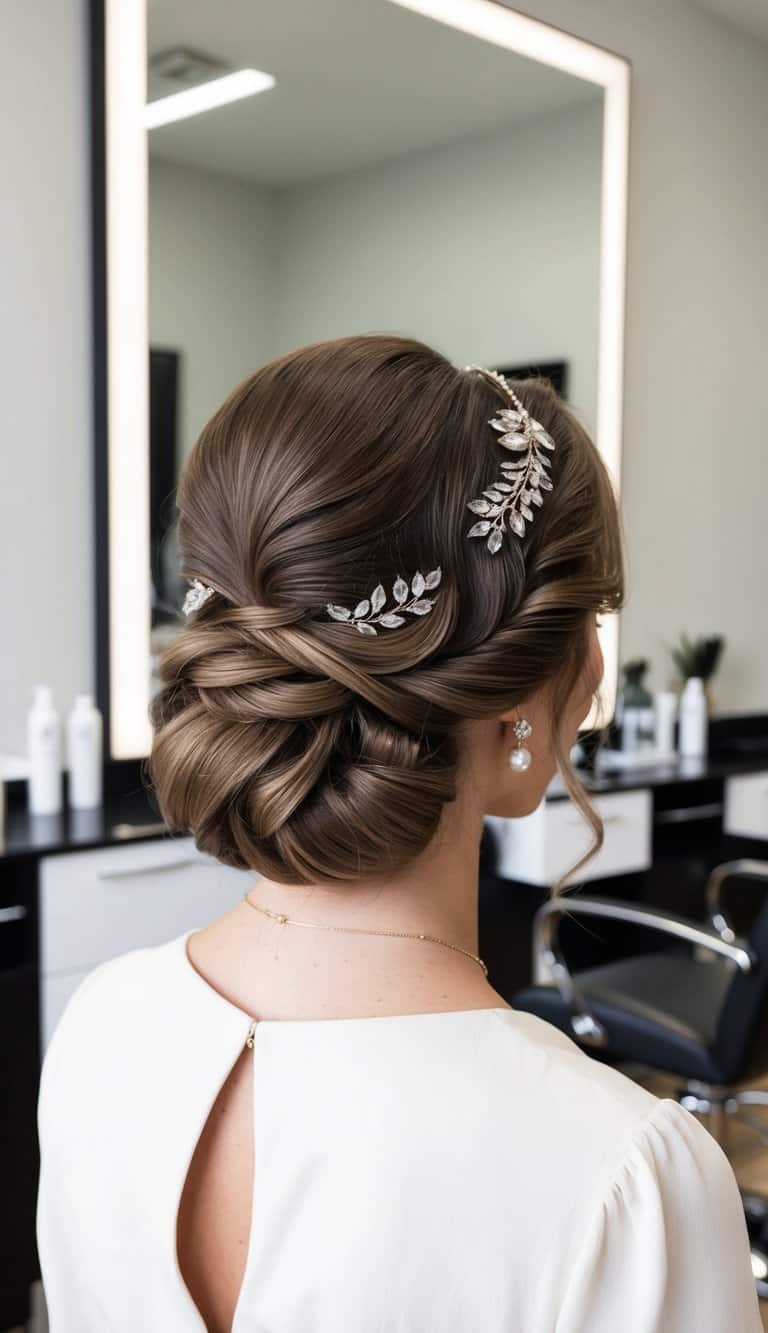
26. Braided Bun with Accessories
The braided bun with accessories is the most celebratory and accessory-driven entry in the simple updo collection — a braided bun base adorned with hair jewels, pins, pearls, clips, or other decorative elements that transform the updo from simple to spectacular. The braid base provides the texture and structure that makes accessories sit and stay in place beautifully, while the accessories themselves elevate the look for the most formal occasions. The key to success here is strategic, intentional accessory placement rather than a maximalist approach — a few well-chosen pieces scattered deliberately through the braided bun have far more impact than many pieces placed randomly.
Best for: Medium to long hair. Formal occasions — black-tie events, weddings, galas. All face shapes. Those who have invested in beautiful hair accessories and want an updo that showcases them to their best advantage.
How to style: Construct the braided bun first (braid the gathered hair, coil into a bun). Then add accessories: insert pearl pins or jeweled bobby pins through the braid loops, clip decorative pins at the bun’s perimeter, or thread delicate chains through the braided sections. Stand back and assess the distribution before finishing with hairspray.
Tips for Perfect Simple Updos
- Use day-old hair: Second-day hair with natural texture and some oil is significantly easier to work with for most updos than freshly washed, clean hair, which can be too smooth and slippery to hold shape. Dry shampoo on clean hair creates a similar effect.
- Prepare with the right products: A light texturizing spray before construction adds grip. A light-hold hairspray after finishing maintains shape without stiffness. A small amount of pomade on the fingertips tames flyaways without weighing hair down.
- Use the right bobby pins: Bobby pins should match the hair color and be inserted in multiple directions (crossing pins, not parallel) for maximum hold. For thick hair, use larger pins or sectioning clips for the structural elements.
- Practice makes simple: Most of these updos require one or two practice runs to achieve the speed and confidence that makes them genuinely quick. A five-minute practice session on an afternoon when there’s no time pressure will make the morning execution much easier.
Frequently Asked Questions
What updo is best for fine hair?
Fine hair benefits from updos that incorporate volume-building techniques — the fluffy chignon, voluminous bun, and looped twist bun are all excellent for fine hair because their construction naturally inflates the apparent volume. Backcombing before gathering, dry shampoo for texture, and volumizing spray at the roots before styling are essential for fine hair updo success. Avoid updos where sleek, flat construction is the aesthetic goal, as fine hair rarely has enough mass to achieve the structural quality such styles require.
Which simple updo lasts all day?
The most secure all-day updos are the Gibson tuck (the tucked construction is inherently secure), the twisted chignon (a twist holds better than a wrap), and the knotted headband updo (the headband provides consistent tension). For any updo to last all day, use multiple bobby pins inserted in different directions, prepare with texturizing spray for grip, and finish with a medium-hold hairspray rather than maximum-hold (which can make hair stiff and heavy, eventually loosening rather than holding).
Can I do a simple updo on short hair?
Several of the updos in this collection work on shorter lengths: the half-up twist works on hair that’s reached below the chin; the knotted headband updo works on any length past the ears; the Gibson tuck works on shoulder-length hair. For hair that’s above the chin, a small twisted pin-up at the crown, clip-based updos, or the addition of a decorative headband are more appropriate options than the full updos in this collection.
Final Thoughts
Simple updos prove that elegance is not a function of complexity — some of the most beautiful updos in this collection take under two minutes to execute and rely on nothing more than basic twisting and pinning. The beauty of the simple updo lies in its relationship with effort: the best versions look as though they required no effort at all, but they also look genuinely beautiful. These 26 ideas provide a complete repertoire for every occasion, skill level, and hair type — the perfect reference for anyone who wants their updo to say “effortless” without actually being effortless.


